TO DO
This is the multi-page printable view of this section. Click here to print.
Editors, tabs and tools
Editors, tabs and tools
1 - IIZI IDE
IIZI IDE
Developers who are familiar with Eclipse will find that much of the same workspace functionality exists in the IIZI Workbench. Any options that are not user-facing, can be accessed by right-clicking and double clicking menu items. As with all Eclipse-based development environments, the iiziGo IDE presents a collection of Views and Editors. The editors that are visible in Eclipse at any given time are context sensitive, and depend on which Tab is selected or which item in a tree view is selected.
The IIZI Explorer
The Eclipse Project Explorer is replaced by the IIZI Explorer and contains four views: your iiziModule Project Explorer, the Outline View, the IIZI Server Configuration View and a Data Source Explorer.

The iiziGo Explorer Tabs
The main workspace
The main workspace is determined by whichever Editor Tab is selected at top. Tabs can represent Panels editor, Text tables editor, the Virtualspace editor, the Image Definitions editor and, of course, the Eclipse Java code editor.

Open Editor Tabs
All menu bars and toolbars are context sensitive to the selected Tab. When you start the IIZI Workspace, a Panel Editor is already open for each main Panel, along with a Text table Editor open for a Text table, and a Virtualspace Editor open for a virtualspace; all these are created when starting with iiziGo Quickstart.
The bottom section of the main workspace holds the Problems View, the IIZI Console, and a Session View which are configurable and familiar Eclipse debug views.

Problems, and IIZI Console Views
2 - The Panel Editor
The Panel Editor
The main Panel Editor and all corresponding panel views are visible when a Panel is selected in your project’s tree view in the IIZI Explorer. By double-clicking any Panel in your project’s Explorer tree view, a Tabbed Panel Editor is added to your workbench; you can, in this way, have several Panels opened at a time.
The Panel tree view is above the Property Editor and to the right of these is the Design area where you can see a graphical representation of your Panel in Microsoft Internet Explorer. These three windows make up your Panel design-oriented workspace. You can also view your design externally in Chrome Canary or IE.
There is demonstration video here:
Panel Editor Toolbar
The Panel Editor has a main toolbar holding tools for manipulating the components and the Panel being designed. The panel editor toolbar is located above the tree view and the Design Area. The Panel Editor has the basic tools needed to manipulate components after they have been created: Cut, Copy, Paste and Delete and all actions performed during design are revertible with Undo and Redo.

Panel editor tool bar and detail of Redo, Cut, Copy, Paste and delete
Components can be aligned inside their bounding box. When a component is created, it is given a default size, but the bounding box of the component can eventually be any size; the component can then be aligned, horizontally and vertically inside of its own bounding box.


Bounding Box and align tools for alignment of component within its own bounding box
Components are selected by clicking in the Panel area or in the Panel tree view. Multiple components are selected by using ctrl-click or shift-click. Other ways of selecting multiple components can be configured in the Selection tool in the toolbar. When multiple components are selected, they can be aligned relative to each other with the Component align tool.
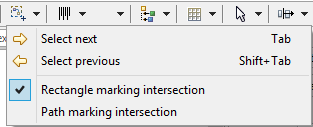

Selection tool and component alignment tools
The Design area
The Design area shows a live instance of the Panel and its components. Any changes to the component properties or hierarchy will be visible immediately. Likewise, any change in the Design area will be immediately reflected in the Panel’s properties. The Design Area Toolbar is at top far right; from the Client tool, you can choice to open the Design Viewer.

Design area tool bar showing: refresh, device choice, orientation, client, language and Zoom
3 - The Property Editor
The Property Editor
Check this panel
Components are defined by their Properties. The properties are laid out in a context-sensitive table called the Property Editor. All component and container properties can be set and changed in the Property Editor; since the list of properties available in the property editor can be long, all properties are structured into groups.

The toggle button for base, layout and style properties
The list of properties corresponding to each property group can be opened and closed independently of each other. Double-click one of the three buttons to isolate a properties list. Each list is organized into subgroups as a tree structure; the combined property list can be filtered with the help of the Filter text field in the Toolbar of the Property Editor.

The header of the property editor
A property consists of a name on the left and a corresponding value to the right. Hovering over the property name displays a tooltip description of the property. Experienced web developers will find many familiar HTML5 and CSS3 attributes as name-value pairs.

Properties as name-value pairs and tooltip of a property name
The property value can be defined  or
or undefined  ;
; clicking the blue arrow will erase the property values. Clicking the plus-sign icon will reveal current values and/or enable you to set values.
The value of a property can be of different data types, but in most cases the value is represented and manipulated as a string; exceptions to this are color and boolean values. The type integrity of the value is maintained by the Property Editor where improper types are marked as erroneous and the description appears in the Problems view.

Error displayed in both the property editor and problems view
Keep in mind that an undefined property may not have a value at all, as it will not exist in the mark-up that defines your component. This is akin to excluding an attribute or property when writing HTML and CSS; other properties may require values and are assigned a default value.
Further styling for normal and disabled states can be achieved through named styles created with the Style Editor, see section Styles.

Two details of the property editor showing various style properties
Note: Some of the possible values accepted by the Property Editor are not evident or listed in the property description nor listed as hints in the value field. If you are experienced in modern CSS3 markup, you can try any of the techniques you are familiar with, and you may find that the Property Editor accepts and interprets most current CSS values and formats. One example of this is the use of the viewport’s vmin attribute which is accepted as percentages, pixel values, and equations composed of the two.
4 - Keyboard shortcuts
Keyboard shortcuts
All Eclipse shortcuts for managing files and folders, managing Editor windows and navigating within Editors are maintained in the iiziGo framework.
It is recommended to use Ctrl + Shift + S, Save All, as you make major changes to your Panels, Text tables and virtualspace entities. This will enable iiziGo to update the many references needed to maintain live connections between your source code, Panels and virtualspace.
Common Java code editor shortcuts
All code hinting and Java code editing shortcuts are available in iiziGo.
| Shortcut | Description |
|---|---|
Ctrl + Shift + S | Save All |
Ctrl + D | Delete Line |
Ctrl + L | Go to Line |
Ctrl + Shift + T | Open Type |
Ctrl + Shift + R | Open Resource |
Navigation
Up and Down arrow keys to navigate any tree view or list;
Forward arrow key for expanding tree items;
Ctrl or Shift + Click for multiple selection.
Ctrl + 3 to hide-show text filter and search fields.
Double-click the main Tab Bar at top of Panel Editor to expand or collapse it in the workspace.
Common Design keyboard shortcuts
With a component selected you may do any of the following:
Alt + Ctrl + Left arrow to cycle through fill, center, alignment, etc.
With a property selected you may do any of the following:
Up and Down arrow keys to toggle between attributes
Up and Down arrow keys to increase or decrease numerical values
Keyboard shortcuts unique to iiziGo
Some of the keyboard shortcuts unique to the iiziGo plugin are written for you in the menu dropdown for each tool.