NEED TO BE DONE
This is the multi-page printable view of this section. Click here to print.
Images and Images Definition
Images and Images Definition
- 1: Importing Images
- 2: Image Definitions
- 3: Image Definitions Videos
- 4: Dynamically loading Images at Runtime
- 5: Assets
- 6: Properties
- 7: How to add images?
1 - Importing Images
Importing Images
All image types that are accepted by modern browsers are accepted in iiziGo. Use the Image Component to add images and graphics to your app or its content. All static images and graphics used in your iiziApp must have an Image Definition. For how to dynamically load images and graphics refer to Dynamically loading Images at Runtime.
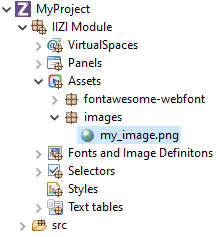

All images and graphics for you iiziApp should be kept in your Assets folder. Copy and paste files and folders into the Assets folder or right click and import your image as you would any other asset into Eclipse. Before an image can be used in the application, the image file must be present in the Assets folder.
Svg image file support
The Image component supports svg files. Image Definitions for SVG files are distinct from other Image Definitions. If the svg image displays differently than expected or will not display at all, you will have to open the file in an appropriate image editor and explore the svg mark-up. Search for the <svg> tag at beginning of file and delete everything before the tag.
2 - Image Definitions
Image Definitions
NEED TO BE UPDATED
All images and graphics used in your iiziApp must have an Image Definition. Your Image Definitions are kept in the Image Definitions folder. To create a new Image Definition, right-click your folder and choose either new definition for an Image (the same wizard is used for jpg, png, or gif) or new definition for an SVG. We made videos to help you on how to set it up here.
Simple image definitions
After importing a graphic or image asset into your Assets folder, Right-Click your Image Definitions folder and choose New Image Definition. It is recommended that you give a name to the image definition that includes the asset name and ends in the word definition or ImageDefinition. In the Image Definition Wizard, you give your definition a name, choose to make an image-set or a single image file definition, and then link your asset to its definition. You can then reference your image or graphic asset by its definition anywhere in your application.

New Image Definition Wizard
Complex image definitions
Open the Image Definition Editor by double-clicking an Image Definition or creating a new definition. As with all IIZI editors, the Image Definition Editor is divided into a tree view, and a property Editor. At the top is the Image Definition Editor toolbar.
The image definition is built by adding new styles and image resolutions. It can then be referred to from an Image component by the Definition name. The displayed image on the end-user will depend on the component state as well as the device resolution.
Select the image file and specify the grid values. “Marching ants” will show the identified images. A warning or error message will be shown in the dialog if values are or seem incorrect.

Once completed, the image definition can be used to represent an image with states that are taken from the UI component in question. The image above consists of an image of a Radio button and Checkbox. In this case, two Image Definitions for the same file should be created, with locations only defined for the respective image; you will have to delete the inappropriate image locations.
[Actually not working, need to be updated.]
These images consist of 32 icons in 4 different files with the states enabled/disabled and LTR/RTL:
You can see that the RTL icons are mirrored (but not all of them).
An image definition of the type Multiple images with optional styles is then used to identify the location of the images as well as to set their names. The states are defined by adding a New image style that will contain the image file reference and style information, in this case a combination of RTL and Disabled.

Image definition states with optional styles

Detail of properties in the Image Definition Editor
3 - Image Definitions Videos
Image Definitions Videos
Some examples:
How to add SVG & bitmap images (automatic)
You need a QuickStart project:
- Select
File > New > IIZI Module Project (Quickstart) - Enter
project nameand unselectCreate text tables with automatic translation - Press
Finish
- Select
Use Windows Explorer to drag/drop your images into the
Assetsfolder- Select
Copy files, thenOK - Press
Yesto generate images definitions
- Select
Your images definitions are located under
Fonts and Images Definitions/ current date time package
Go to your panel
- Right-click on
Componentsfor context menu - Add
component > Image - Click on
Image > Select Image Definition… - Select
your image, thenOK
- Right-click on
Place
your imagewherever you want
In the example we showed you PNG / SVG formats.
How to add SVG & bitmap images (manually)
You need a QuickStart project:
- Click on
File > New > IIZI Module Project (Quickstart) - Enter
project nameand unselectCreate text tables with automatic translation - Press
Finish
- Click on
Use Windows Explorer to drag/drop your images into the
Assetsfolder- Select
Copy files, thenOK - Press
Noin order not to generate automatic image definitions
- Select
Right-click on
Fonts and Images Definitions- Select
New > Image Definition or SVG Definition - Enter
a name, then clickNext - Click on
Browseand selectimage, thenFinish
- Select
Go to your panel
- Right-click on
Componentsfor context menu - Add
component > Image - Click on
Image > Select Image Definition… - Select
your image, thenOK
- Right-click on
Place
your imagewherever you want
In the example we showed you PNG / SVG formats.
4 - Dynamically loading Images at Runtime
Dynamically loading Images at Runtime
To load images into your application at runtime, start with a placeholder in an Image component. Dynamically loaded images do not require an Image Definition in the Image Definitions Folder, but instead require that you instantiate a RuntimeImageDefinition in your Java code. You can use the UICreateEvent to access your Panel and its Image component, and use the Image component’s setImage method to assign the image that you are accessing by URL or API.
For details on accessing Panels and UI Components in Java code see the UI Annotations section.
Image REQUESTED

Sample Java code for setting an Image Definition dynamically and loading an image at runtime
5 - Assets
Assets
The Assets folder contains all files used in the application that are required. They are typically images of various types, videos, audio files, static HTML files, JavaScript files, etc. Anytime an external file is needed and the file should be included in the iiziApp for distribution to a server, they should be placed in this Media files folder.
Adding files
- In Eclipse, you add
filesto a folder usingdrag-drop, e.g. from a folder onyour machineor afile server. You can also use theEclipse Import wizard.
Once files populate the asset files folder, they can be used in the application for e.g. Image definitions.
Tooltips
- IIZI adds support for tooltips everywhere in Eclipse, so if you
let the mouse hover over an image filein the media folder, the following could be displayed:
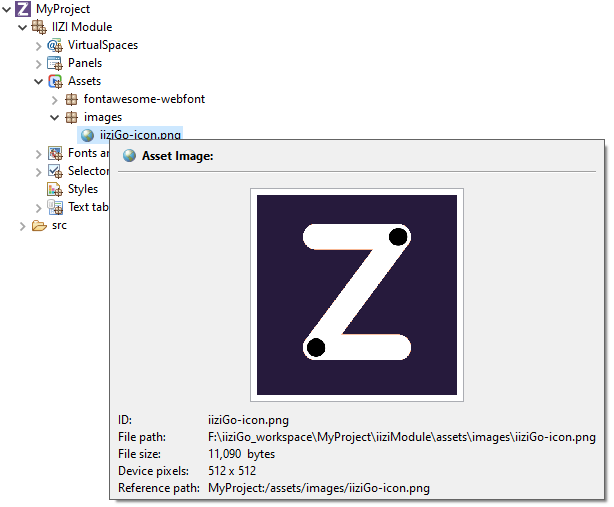
The icon used for each file depends on the file type as well as what external programs are installed in the machine, e.g. to handle editing of images (here Adobe Photoshop is used).
References
- As you may notice, there is a
Reference(orReference path) to the image that is unique in the workspace. For more information about references see the chapter References. Other details about the selected element are also shown in the tooltip depending on the element type.
6 - Properties
Properties
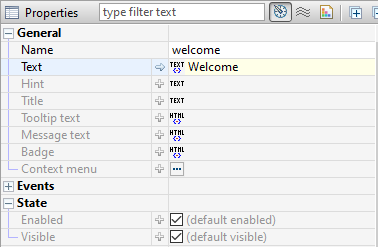
The properties of the selected component are shown – and are editable – in the Property Editor. If the Property Editor is not visible, select a Panel, a container, or any component, and the Property Editor will appear below the Panel’s tree view. For a complete guide to using the Property Editor see section Editors, Tools and Tabs.
The properties that appear in the Property Editor are context sensitive and depend entirely on the selected component or selected container. A property consists of a name on the left and a corresponding value to the right. Hovering over the property name displays a tooltip description of the property. Experienced web developers will find many familiar HTML5 and CSS3 attributes as name-value pairs.
Container and component properties
Always keep in mind that the properties displayed for you in the Property Editor correspond to the container or component that is selected. With nothing selected – or with focus outside of the Panel Editor – your Property Editor will be empty. With several components selected, the editor will exclude unshared properties.
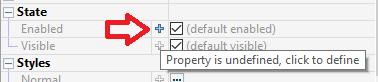
An undefined property may not have a value at all, and will not exist in the mark-up that defines your component. This is like excluding an attribute or property when writing HTML and CSS; it simply will not exist in the mark-up. Some properties are required and therefore require values, and are assigned a default value. To see the default values, mouse over the property for the tooltip or click the arrow at the start of the value field to reveal its default value in the value field.

The name, actions, events and states of a component will always be found in the Base properties. The width, height and position will be in the Layout properties and most all the remaining properties we associate with CSS will be found in the Styles properties.
General properties
Although property sets are different depending on the component selected, the following properties exist for all components: Name, Title, Tooltip text, and the boolean states: Enabled and Visible.
7 - How to add images?
How to add images svg & bitmap?
How to add images SVG & bitmap? (auto)
There is a tutorial video just down below.
You need a QuickStart project:
- Select
File > New > IIZI Module Project (Quickstart) - Enter
project nameand unselectCreate text tables with automatic translation - Press
Finish
- Select
You can use
Windows ExplorerDrag/drop
your images into the Assets folder- Select
Copy files, thenOK - Press
Yesand it will generate for you all images definitions - All your images definitions are located under:
Fonts and Images Definitions/current date time package

- Select
Go to
your panel- Right click on
Componentsto display context menu - Add
component > Image - Click on
Image > Select Image Definition... - Select
your imagethenOK
- Right click on
Now you can place your image wherever you want
In the example we showed you PNG / SVG formats.
How to add images SVG & bitmap? (manual)
There is a tutorial video just down below.
You need a QuickStart project:
- Select
File > New > IIZI Module Project (Quickstart) - Enter
project nameand unselectCreate text tables with automatic translation - Press
Finish
- Select
You can use
Windows ExplorerDrag/drop
your images into the Assets folder- Select
Copy filesthenOK - Press
No - Right click
on Fonts and Images Definitions- Select
New > Image DefinitionorSVG Definition - Put
a namethen clickNext - Click
on Browse - Select
the imagethenFinish
- Select
- Select
Go to
your panel- Right click on
Componentsto display context menu - Add
component > Image - Click on
Image > Select Image Definition... - Select
your imagethenOK
- Right click on
Now you can place your image wherever you want
In the example we showed you PNG / SVG formats.