NEED TO BE DONE
This is the multi-page printable view of this section. Click here to print.
Starting data first
- 1: What does starting data-first mean?
- 2: How to use a Database?
- 3: Database editor
- 4: Database transaction types
- 5: Connect to a VirtualSpace
- 6: VirtualSpace Table creation
- 7: Web Services
1 - What does starting data-first mean?
If your app requires that you start from your data provider first, iiziGo provides the Database Data Connector for connecting transactions with the VirtualSpace. The iiziGo plugin utilizes Eclipse Data Tools Platform (DTP), while the iiziServer uses a direct JDBC implementation. Make sure that the Module project has the Database connector plug-in enabled to define a new Database Transaction (DB Transaction).
To enable the database connectors:
Right click your project folderin the IIZI Explorer and selectProperties.- Tick
Database connectorandApply and close.  will appear in the IIZI Explorer.

2 - How to use a Database?
Create a new Database
Create a new Database Transaction using the New Database Transaction Wizard.
Above the BIRT sample database is used, and is available through Help > Install New Software (and select category Business Intelligence, Reporting Tools = BIRT).
Select New to add a new Connection Profile.
NEED IMAGE HERE
Connect to an existing Database
Before a database transaction can be created, a Connection Profile needs to be created. It contains information that specifies the JDBC driver and parameters, database name and location, and sometimes a user account for accessing the data.
3 - Database editor
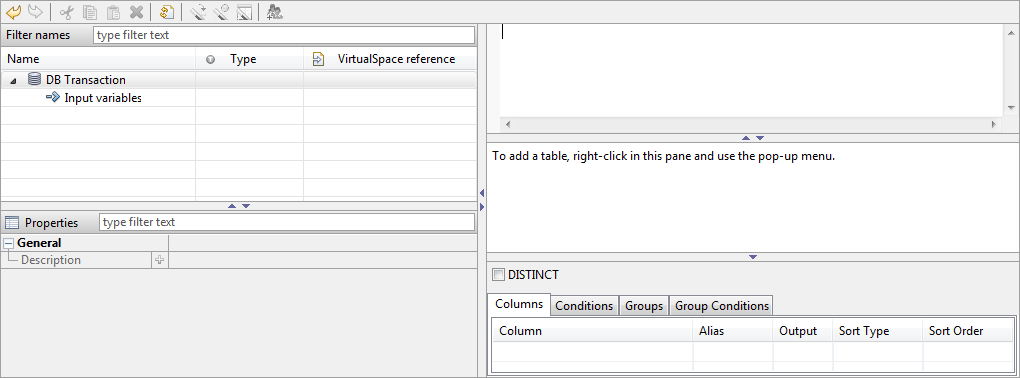
The Database Editor consists of an SQL Builder that helps you build your query statement. On the left of the Database Editor, you define the properties for the Input and the Result and the connections to a VirtualSpace.
SQL Builder
The top-right entry field is used to input or build the SQL query statement. The right-middle area is used to specify the tables and columns and to create join’s. The right-bottom part specifies sorting, conditions, grouping, etc.
4 - Database transaction types
The SQL Builder supports the SQL Query Statement types SELECT, INSERT, UPDATE and DELETE. If the statement syntax does not match these types, the SQL builder helper parts are disabled. The SQL syntax is always verified and errors are shown with red squiggly underlines. Hover the mouse over this location to display a tooltip which will indicate the current problem. To re-enable the SQL Builder, correct the SQL syntax and make sure to have the correct types that are listed above.
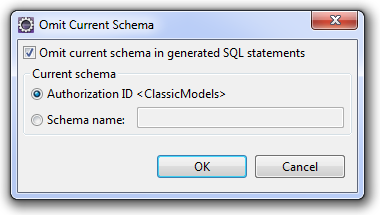
Select the context menu item Omit Current Schema, followed by selecting the checkbox for SQL statement generation:
Statement generation for database connector
SELECT
  EMPLOYEES.EMPLOYEENUMBER,
  EMPLOYEES.LASTNAME,
  EMPLOYEES.FIRSTNAME,
  EMPLOYEES.JOBTITLE
  FROM EMPLOYEES
    JOIN OFFICES
      ON EMPLOYEES.OFFICECODE = OFFICES.OFFICECODE
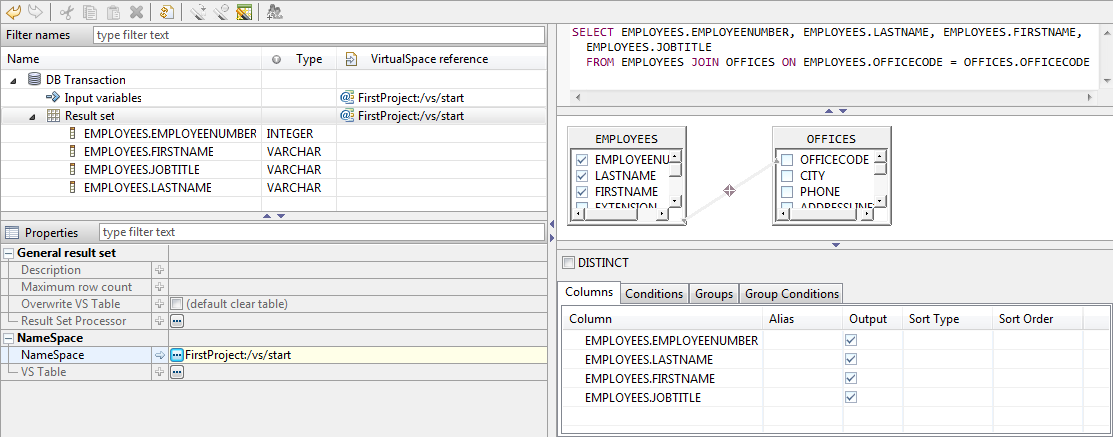
As the statement builds up, the left side will show the result set columns with the SQL datatypes.
5 - Connect to a VirtualSpace
Once you have connected to an existing database or initiated a new iiziDatabase for your iiziApp, you are ready to connect to a VirtualSpace. The data can be efficiently coupled to a vsTable once a VirtualSpace is connected to your Input and Result Set. In the Database Connector Editor, specify the VirtualSpace connection for the Input variables and Result set.
In our example the same VirtualSpace is used for both input and output, here named start, but the result could be placed in a different VirtualSpace. To view SQL Results, right-click in the query statement editor and select Run SQL, and the SQL Results view located at the bottom pane in the workspace will show the following:

6 - VirtualSpace Table creation
Now that results are present, the VirtualSpace Table can be created and connected to the columns using the tool:  Wizard to create the
 vsTable, the columns and the connections. Click on the table creation wizard to open a prompt to create the table with 4 columns named as the database columns; if asked to open the VirtualSpace, reply No. The database editor tree now shows the connection of the result to the table and columns instead of the VirtualSpace.

Now select the populate table tool:  Populates the connected vsTable with the rows of last result set.
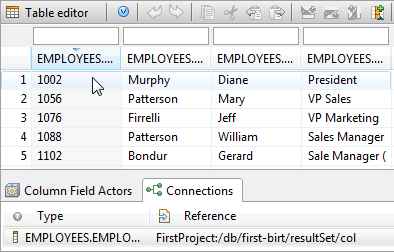
The tool will ask you to populate twenty-three rows in the vsTable, and although it prompts you to go to the vsTable, select No. Hover the mouse over the table or over the columns in the VirtualSpace reference column to display the tooltip. The tooltip for the vsTable also displays the first five rows and the connections. By carefully moving the mouse into the tooltip – to avoid dismissing it – you can select a column header in the table. This will open the VirtualSpace Editor and focus the selected column.
7 - Web Services
The Web Services data connector connects web services with VirtualSpace Fields and Tables as a web service consumer.
There are currently two supported web services types:
- RESTful (REpresentational State Transfer) using URL encoded parameters, and
- SOAP (Simple Object Access Protocol versions 1.1 and 1.2) using WSDL definitions.
The RESTful type is typically used for “simple” stateless services, whereas SOAP using WSDL is formal and more complex, also providing XML Schema validation of requests and replies.
The REST services are more unpredictable than SOAP services as the reply can vary both in format and contents in many cases. The positive about REST is that the services generally are simple, easy to use and fast to implement. It is not the necessarily the service architecture that makes it so, often it is just the fact that the services are not so complex.
Make sure that the Module project has the Web Services connector enabled in order to be able to define a new Web Service.
The folder used in the Module project is  .
.
Web Services Editor
The Web Service Editor is divided into two areas; the left side is used for the request, i.e. for all parameters that makes up what is going to be sent to the remote party, and the right side for the remote reply that is received.
The top part of each area consists of a tree structure of the request and the reply respectively. The bottom part contains a property editor to edit the selected item in the tree of the same area.
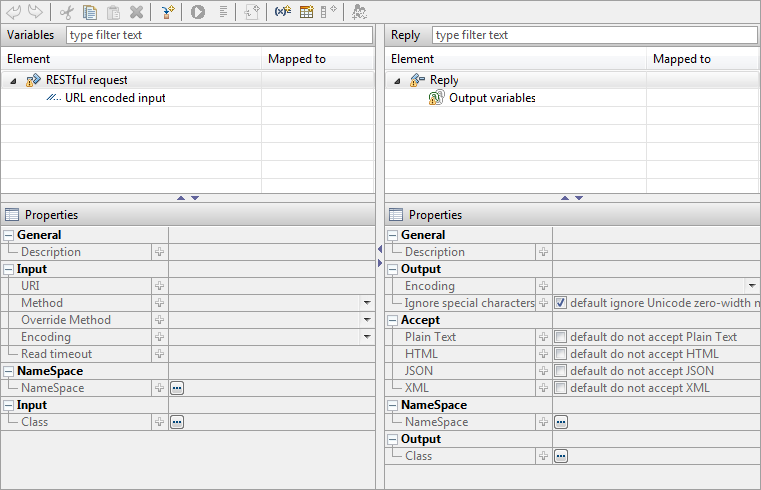
REStful web service
A RESTful web service is created using the New Web Service Wizard, and currently only supports URL encoded parameters. This web service type is using the HTTP protocol and can be secured with SSL. The parameters are sent either in the request URL as e.g. http://url/path?p1=abc&p2=def or in the request body for larger data, using the HTTP methods GET, POST, PUT or DELETE.
Using the database analogy, the methods corresponds as Get = select/read, Post = update, Put = insert/create and Delete = delete.
The RESTful web services properties for a request are:
- URI:
Defines the web service URI including protocol, port specification (if required), but without the query (or parameters) part that starts with a question mark (?).
- Method:
Select the HTTP method to use, i.e. one of GET, POST, PUT or DELETE.
- Override method:
Specifies the method that overrides the request. Certain services (e.g. Google) uses a POST method overridden by a GET. In this case, specify GET as the overriding method. This technique is sometimes required to provide additional data that can be limited with e.g. the GET request.
- Encoding:
Specifies the encoding for the parameters, default is UTF-8.
- Read timeout:
Sets the maximum read timeout in milliseconds for the socket connection and is used to control the response time. The default value is 20000, i.e. 20 seconds. If a reply is not received within this time, the web service request fails with a timeout.
- NameSpace:
Sets the namespace to use for the input parameters. All input parameters must be located in this namespace (but the input and output namespaces can be different).
- Class:
Used for advanced processing, building and/or manipulation of the request. The class must implement the interface iizix.ws.api.IRESTfulRequestProcessor. It has a single method that is called prior to formatting the web service request, enabling e.g. fetching a Token that is used in the request to identify the requestor. See the JavaDoc of the interface for more information.
Creating a request
A free and public web service that gets the geolocation of an IP address is used in this chapter (see http://www.hostip.info/use.html for more information).
Fill in the request parameters as shown below:
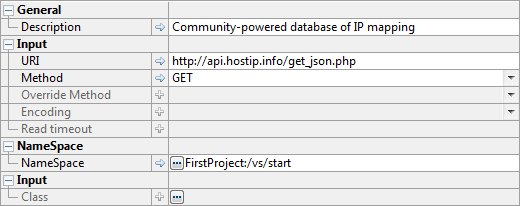
In this case, the JSON reply format is chosen due to get_json.php
(the path defines JSON for this service). The VirtualSpace start is also connected to the request.